Sunday, April 24, 2016

Solar dyeing revisited

It's a month since I tried solar dyeing of wool using my black/purple pansies.  Here are the results!
 The jar with the frozen flowers is on the left.  You can see that the colour didn't penetrate all through the wool with the fresh flowers on the right.
 That jar also developed a bit of mould on top, though it didn't affect the results.
Here are the 2 skeins out drying.  I was expecting more of a purple shade, but it's come out a lovely blue.  Clearly, frozen flowers work better, so I'll use those in future.

If you want to try this, add your skein to a 1 litre glass jar.  Mix hot water with 2 heaped teaspoons of alum and 1 teaspoon cream of tartar. Leave in a sunny position.

Friday, March 25, 2016

Dyeing with flowers

I've been interested in dyeing with flowers ever since I got India Flint's book, Eco Colour, some years ago.  However, there's been a lot on my plate since then - overseas trip, earthquakes, moving south, doing an arts degree, moving north (a bit) again, getting established here and so on.  I've been busy over summer too, and so I've missed a lot of summer flowers.  No matter.  I planted some black and purple pansies over a year ago, especially for dyeing, and had some stored in the freezer. Although I've removed some of the larger plants (they are pretty vigorous), there's lots of small ones coming up so there'll be plenty of flowers for next year.

I decided that, while I have several days free over Easter and no commitments, I'd play with some of the things I'd put on the back burner, and this was one of them.  I had some spare wool, which I wound into skeins.  Then, following directions I found here 
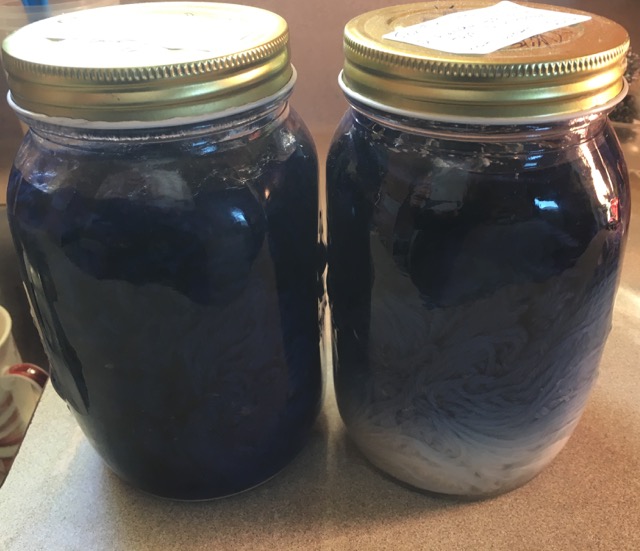
http://www.thejournalforwsd.org.uk/, I made up 2 jars of pansies for solar dyeing.

 This is jar #1, with wool in the bottom, alum and cream of tartar added as the mordant, and the frozen flowers on top, all topped up with hot water.
 You can see the colour start to come out of the flowers almost straight away.
I moooshed the flowers around in the jar to get the colour down to the bottom.  It's looking good.  Then I prepared the second jar the same way.
 Jar #2, with fresh flowers.
No colour happening here, even when I push the flowers around.  I'll be interested to see if I get any colour from these fresh flowers.  The jars are now sitting on a windowsill wrapped in black plastic (it's not exactly the optimum time of year to be doing this, but I'm not in a rush).

I went out and picked some other flowers to put in the freezer - dahlias, penstemons, roses, nasturtiums, cinerarias and fuchsias.  I'll try these out another day.


When i think the pansy wool is done, I'll post photos of the results.

Tuesday, March 01, 2016

On the design wall

It's 1st March - time again for my beginners' Electric Quilt class to start up for 2016.  EQ7 is a great piece of software, and I've had this version and earlier versions for quite a few years now.  But it's also very complex, and it can be daunting.  I know a few quilters who have EQ but who don't really use it, or just use some very basic bits of it because they don't fully understand it.  The reference manual that comes with it is comprehensive, but it's that - a reference manual.  It's not called "How To Make A Quilt with EQ" - so that's where this beginners' class comes in, because it IS about how to make a quilt.  We get familiar with what's in the software; the Libraries where the preset blocks and fabrics are; the different quilt and border layouts and options; how to use the colouring tools and much, much more.

So....what's on my design wall from EQ?
These fish are simplified versions of  the ones found in the Applique Library.  They are destined (along with 9 more) to become a child's quilt.  I can see how this whole quilt will look when put together by using EQ.


This is a portion of a quilt big enough for a bed. I bought the gorgeous batik fabrics for this lovely geometric design -  easy to draw when you have EQ.   There's lots of secondary patterns going on here!


With EQ7, you can make design and make quilts like these.  Join the Beginners' Class at http://academyofquilting.com/ and you get full instructions, screen shots and videos, plus access to the tutor (me).  Everything is downloadable, so you can save it all to your computer.  The class starts on Friday (Saturday in NZ time), and is open for enrolment now.